
In the wake of the recent run-up in Bitcoin, and then LiteCoin, and then Ethereum, you may be thinking, “Well I’d like to get involved in this, but I can’t afford that.” So then you learn that you can “mine” for cryptocurrencies, but it all seems ridiculously complicated.
Well, it turns out there’s a ridiculously easy way to get started mining.
Enter Minergate
Minergate is a mining pool, which means that when you join it, any computers that you use to mine with them get added to a group of other computers, and you each get a reward proportional to your computing power. They’re not necessarily the “best” mining pool, but they are the easiest to get started with, and done is better than best.
I’ve created a short video. You can be up in mining within about three minutes. Written Instructions are shown below the video. If you found this guide helpful, consider using my link to sign up for Minergate. I’ll get a small commission at no cost to you.
Minergate Starting Instructions
- Click the link to go Minergate.
- Click “Sign up” and fill out the form.
- Click downloads
- Download the GUI miner for your operating system
- Run the install program and just choose the default prompts.
- Run the Minergate program.
- Choose start mining.
- Done
Configuring Minergate
By default, Minergate will try to mine whatever coin it thinks was most profitable in the last hour and supposedly switches to keep you profitable. Some things to consider.
Core Decisions
You can choose the number of cores to mine with. Most computer processors these days are “multi core” which means that the processor is made up of multiple processors.
There is a dropdown that allows you to choose the number of cores to use. The more cores, generally the faster you can mine, but also the more heat you generate and quicker you may wear out your processor.
Some people report that using one or two cores fewer than the maximum number sometimes results in a higher hash rate (indicator of mining progress), so you may want to experiment a bit.
CPU vs GPU Mining
Bitcoin and most of the alt-coins are mined more efficiently with graphics processors (GPU) than with the central computer processor (CPU). However, a few -coins, such as Monero (XMR) and Aeon were designed specifically to be mined with a CPU. This means that if you’re on a laptop (or cheap desktop), chances are good you should stick to Monero and Aeon. If you have a gaming computer, chances are good that you have a GPU and should use it to mine a different -coin, such as Zcash.
There are so many coins, AAAGGGHHHHH
Don’t freak out. You don’t have to become a crypto-savant to do this. Just choose automatic mode, and Minergate, and you’ll be mining. But if you want to take things to the next level, you can learn more about the different types of crypto-currencies. At the time of this writing, the best bests are: 1) CPU mining…either Monero or Aeon. 2) GPU mining…Zcash.
Okay I’m mining; how do I get paid?
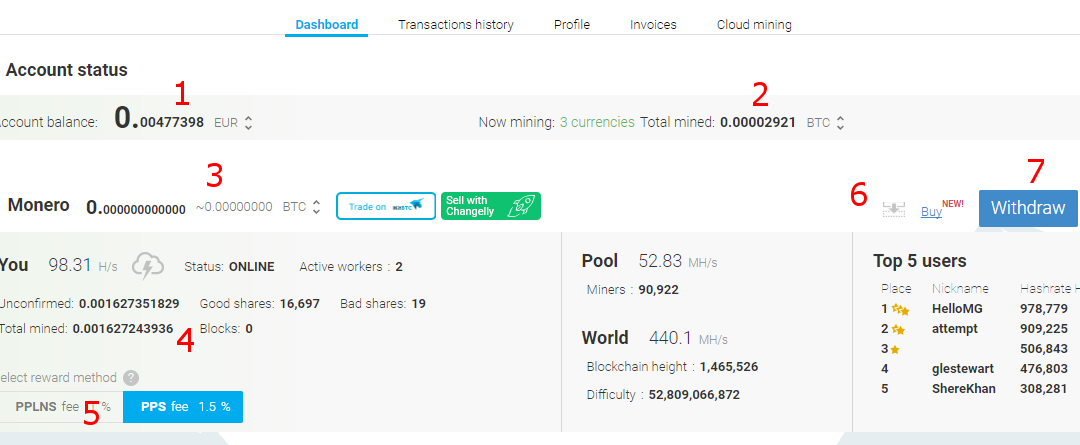
Look in your Minergate dashboard on the website, and you’ll see something that looks like this:
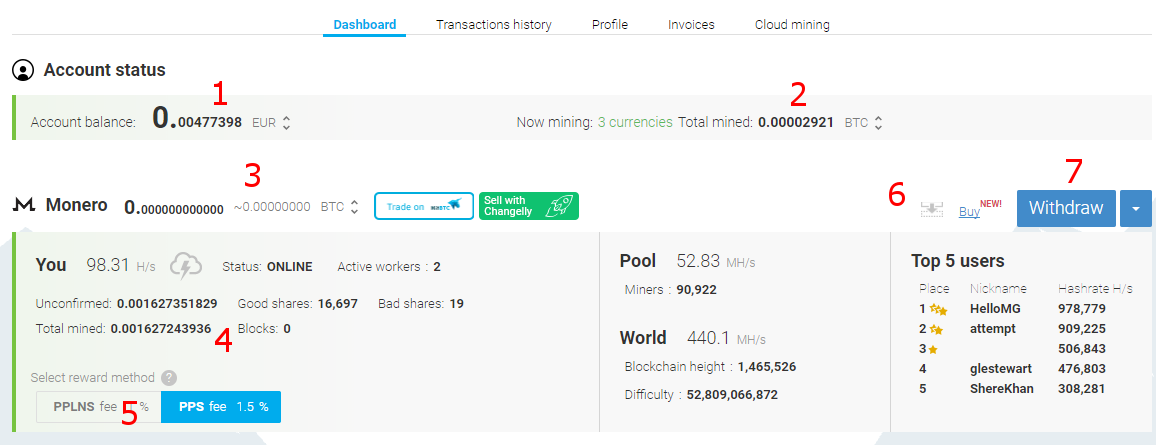
Minergate dashboard
- This is your overall account balance. You can choose to see its value in Bitcoin, US Dollars, or Euros.
- This is the total value of what you have mined in your account (not sure the exact time frame). Same denomination choices.
- This is the amount of whichever coin you’re looking at that you have mined and its value in Bitcoin, USD, or Euros. Note that this amount of coin is yours but it’s being held in Minergate’s wallet, not yours at this moment in time. You can use the buttons next to this number to change your mined coin into another currency. For example, if you’re mining Aeon, you can use Changely to exchange your Aeon into Bitcoin or Litecoin.
- This is the total number amount that you have mined and how much of it has been confirmed. Confirmations can take a few minutes to several days depending on how fast your machine is and other factors. It’s not really yours until it’s confirmed.
- This is a choice you have in terms of fees. It takes longer to confirm the PPLNS but there’s a lower fee. If you’re going to be mining for a long period of time, you’re probably better off leaving it as PPLNS.
- These buttons can be used to move the dashboard of the coins you’re mining upward or lower for your viewing convenience. Put the coins you’re mining at the top.
- As noted in Number 3, the mined coin is being held for you in Minergate’s wallet. To truly make it yours, you need to transfer it to your wallet. Click the Withdraw button to transfer the coin to your private wallet. (Note: you have to have a wallet for that currency to use this option. Otherwise, use Changely to exchange your mined coin for a currency for which you do have a wallet.
Here’s a video explaining some of the more advanced options and how to get your money out.
That’s it for the moment. There’s more to learn though. It’s reported that the GUI miner is not as efficient as the command line (console) miner, so in a future post, I’ll walk you through setting up a console miner.
Recent Comments