It’s pretty inexpensive and easy to set up a website these days. Companies like Hostgator and Dreamhost have you search for a domain name, fill out a couple forms, enter a credit card and congratulations. You now have a website. After a while, you may feel that your needs have outgrown your account, or that the service is not up to par or that your website is too slow. It’s obviously time for an upgrade, but from what to what?
From What?
Chances are you originally signed up for what is known as “Shared Hosting”. On a shared account, you share the server (computer hardware) with up to several thousand other users. If you get lucky, most of the websites are barely used at all, and your performance is decent. If you are unlucky, you may share the server with several other high traffic websites, which may impact the speed of your own site. Additionally, you share an e-mail server with several thousand other accounts, so if one account is flagged as a spammer, it may prevent you from sending any e-mail at all to some domains.
To What?
You essentially have three choices. You can upgrade to:
a bigger shared hosting account and hope you have better luck. Sometimes these will be called premier or business plans.
a Virtual Private Server (VPS).
a Dedicated Server.
Shared Hosting
If you don’t need the additional bandwidth or storage space of the premium shared host, then you are really just paying for a fancy name most of the time. You are not really paying increased performance. But what about “unlimited plans”? To quote the T-Mobile Commercial, they’re more like Um…Limited plans. They’re just hoping you’ll be lured by the word unlimited but not take them seriously. If you do take them at their word, you may find that you account is suspended.
If you do opt for a shared hosting plan, you should get a “metered” account that has an allotment of a specific amount of hard drive space and bandwidth. Companies with such plans are generally less likely to oversell their servers.
VPS
A VPS is similar to a shared account in that multiple accounts are on the same server (computer), but in this case, the server is divided into several virtual machines. You have complete control over your virtual machine, so that you may customize it however (mostly) you like. VPS’s can be used to host website, e-mail servers, ventrilo (online gaming chat) servers, and even Minecraft.
There are two basic types of VPS—mananged and unmanaged. Managed accounts are very similar to shared accounts in that the webhost company takes care of most of the chores of managing the server, but you pay for the privilege; usually $25 or more per month compared to a comparable unmanaged account. In an unmanaged VPS account, you are solely responsible for installing and maintaining your server. The webhost will install a barebones operating system, and you will get to do everything else. The benefit is more control and a deep discount.
In a VPS, whether managed or unmanaged, you will also get to choose your operating system, usually Windows or Linux. Typically Linux accounts are much cheaper than comparable Windows accounts.
Accounts are usually priced based on the amount of disk space you are allotted and the amount of memory you can use. VPS servers can be oversold, so it’s a good idea to test your new VPS quite heavily while you are still in the money back guarantee period. It’s also a good idea (no matter what kind of plan you have) to pay month by month rather than yearly.
There are several virtualization methods available, such as OpenVZ, KVM, Xen, and “Cloud”. OpenVZ often gets a bad rap as being “easy” to oversell, but in reality, any VPS can be oversold, so choosing a reputable company and testing your VPS is still the best way to go. In many cases, upgrading your shared account or going with a better company may be a better option than VPS.
Dedicated Server
Dedicated servers are similar to VPS in how they run (managed or unmanaged) but instead of sharing a computer with other users, you get the whole computer to yourself. Dedicated servers are generally much more expensive than VPS. Personally, I think that unless you are making enough money to justify the cost of a dedicated server, you are better off going VPS (or even shared).
Bottom line
Know why you want to move webhosts. You are more likely to choose a more suitable webhost.
Balance your needs with you budget. Do you have thousands of active members in a forum or are you running a blog that not even your mother reads? Do you have half a dozen websites that you maintain? Are you making money off your website? How vital is it that your website not go down?
How adventuresome are you in terms of learning new things? How much hand holding do you need?
Check your current website’s statistics and see how much disk space you are using and how much bandwidth you used each month in the last year.
Ask yourself if you could save disk space and bandwidth by moving video files to Youtube or Vimeo
This little concoction is the product of experimentation with Thai curry paste. It’s quite flavorful and with a light, fresh taste, and unusual vegetable composition.
Curry Sauce:
1 can coconut milk (approx 1 1/2 cups)
1 1/2 tsp curry paste (available from most Asian food stores; we have used yellow and panang paste with good results
1-2 tbsp fresh ginger (sliced or minced) or 1 tsp ginger powder
3/4 bunch of cilantro (stalks included)
1/4 tsp red or cayenne pepper
Place all ingredients in blender. Blend until smooth. Taste and add salt if necessary.
Stir fry:
1 pound ground pork (we’ve tried chicken, turkey, and ground beef, but pork is the best tasting)
1 onion diced
1 sweet potato diced
2 celery stalks diced
2 carrots diced
1 cup broccoli florets cut small
1 bell pepper diced (we prefer red)
1 squash or zucchni diced
Should be about five cups of vegetables total when diced.
Heat saute pan over medium heat. Place small amount of coconut oil in pan and brown pork with a pinch or two of salt. Dump meat in a bowl, and add a little more oil. Place harder vegetables in the pan (carrots and sweet potato) and add pinch of salt. Saute until they just begin to soften. Dump in bowl with meat. Repeat the process with broccoli and squash. Then repeat again with celery, onion, and peppers.
Place pork and all vegetables back in the pan and pour curry sauce over the meat/vegetable mixture. Stir occasionally until warmed through. Serve over jasmine rice.
Permaculture is not a word. It’s a paragraph. Some of what I’m putting here is controversial. Permaculture, at its core, is a way of thinking about the world and solving problems in a systematic way that goes beyond sustainable. As Geoff Lawton says, “Don’t plant a tree; plant an ecosystem.” It’s best know applications are to agriculture. High level practitioners are able to achieve feats that are seemingly miraculous (see video for an example).
The word was coined by Bill Mollison and David Holmgren. Bill Mollison put together a course teaching the system, and anyone who has taken a PDC (Permaculture Design Course) does permaculture and can use officially use the word. Of course anyone can learn or use Permaculture.
Unfortunately, there is quite a bit of infighting in permaculture (mostly among posers). As an example, Mollison and Holmgren told Sepp Holzer that they thought that what he practiced was permaculture and wanted him to use the word, but other lesser practitioners insist that Holzer does not practice permaculture as he has not taken a PDC.
Another problem with permaculture is that it is infested with hippies. There’s nothing wrong with hippies per se, but a large proportion of them seem to do a lot of hating in the name of love. Another problem with some hippies is what I call toddler syndrome, “What’s mine is mine, and what’s your is mine.” Some of them will accuse successful permaculturists of not following the permaculture ethics because they make a profit and do not share it with the accuser.
Another problem is what Paul Wheaton calls purple breathers—the injection of New Age style religious elements into the Permaculture Design Course. There are people who simply insist that you can’t do permaculture without drums, chanting, and the earth Goddess. This particular problem seems mostly to be an American issue. Paul Wheaton maintains that this insistence (and the denigration of profits) prevents many farmers from adopting Permaculture. Geoff Lawton states that their are no supernatural elements to Permaculture and no Permaculture Design Course should incorporate them into the curriculum (although after hours is fair game)
These three issues have subsided somewhat as two of most prominent permaculture promoters in the U.S. are pro-profit and pro-results. Their influence has helped attract a large number of new people to the movement who do not share the hippie hang ups.
Personally, I see permaculture as a way that Christians can fulfill the first commandment in the Bible, to fill the earth and have dominion over it. Destroying the earth somehow doesn’t seem to be an appropriate part of that plan. Whatever you believe about carbon and Global Warming, there is no doubt that humans have destroyed a large number of resources, most spectacularly seen in the desertification of the Fertile Crescent and sub-Saharan Africa. I think that more Christians should be involved in Permaculture as a way to help the poor, improve their own lifestyles, and fulfill God’s commands.
With that introduction, here are some permaculture resources:
Books:
Gaia’s Garden, by Toby Hemenway. This book is a fabulous introduction to permaculture. Toby has a strong science background and it comes through in the text (without being boring). The focus of this book is on urban or suburban lots. If you are wanting to implement permaculture on a bigger scale, then you might want to read this second (after the book below). Otherwise this should probably be your first permaculture book. (see podcasts for an in-depth review).
Sepp Holzer is such a genius that he seems crazy to us normal folk. He owns a 90 acre farm in the Austrian alps where he has been able to pull of such feats as growing tropical citrus trees. He has a heavy focus on ponds, water, and hugelkultur (among other things). If you are wanting to implement permaculture in a larger area, this should probably be your best first read followed by Toby’s book (above).
Podcasts
My favorite way to learn about things. My two favorite for permaculture are Jack Spirko’s and Paul Wheaton’s. However, as they cover a lot of topics, not just permaculture, I have excerpted highlighted episodes below. (Warning: Paul has a tendency to ramble and get off topic and occasionally cusses).
Interview with Geoff Lawton 2 Tony Rinaudo of WorldVision gets a shout out for essentially reforesting Niger with nothing but a pocket knife. His work was brought to worldwide attention because the difference could be seen from satellite.
Pour 2 quarts of milk into a 3 quart container and add one packet of dry powdered milk (enough to make one quart).
Turn oven on for two minutes
Microwave milk until it is 120 degrees (about 6-8 minutes)
Cool milk until it is 110 degrees
Add 1 cup live culture yogurt and stir
Place container in oven
You’ll need to monitor the temperature of the mixture. You want to try and keep it between 100 and 115 degrees. (Turning the oven on for two minutes every two hours does the trick for me. Helps if you have a probe thermometer.)
Remove when done 4 -8 hours. The longer you leave it the gellier it will be but the tarter it will be.
Step 2: Make Yogurt Cheese
Pour Yogurt into a colander lined with cheese cloth. Place a weight plate and small weight on top (can of soup works).
Place colander over large bowl and refrigerate over night.
In the morning, the bowl will have whey which you can use for protein shakes
The colander will contain the yogurt cheese (add some chives and garlic powder, and you have an awesome dip.
But we’re going to use ours to make frozen yogurt.
Step 3: Make Frozen Yogurt
Empty yogurt cheese into a large bowl and add
4 Cups Yogurt Cheese
3/4 Cup Sugar
1/2 Cup agave nectar (or Light Corn Syrup)
1/2 cup passion fruit juice (about 10 fruits worth)
Everyone loves chili. Here’s my original take on the stuff. I now make my own chili powder according to Alton Brown’s Homemade Chili Powder recipe. This chili is mean mean not because it’s hot, but because it’s so good you can never go back. The recipe is very flexible and can give you anything from a non spicy stew all the way to inferno hot.
Ingredients:
1 – 1.5 lb ground beef (to make veggie chili, just leave this ingredient out)
0 – 4 cans beans to taste (I like to use 2 cans of kidney and 2 cans of black beans)
4 – 8 garlic cloves thinly sliced or minced
2 medium to large onions
10 Roma tomatoes (seeded and diced)
6-8 Tomatillos
6 – 10 Bell peppers (use any combination of colors you feel like)
Spices: chili powder, cloves, cumin, black pepper, cinnamon
Directions:
Dice all veggies. Seed the bell peppers. (Seed hot peppers and remove membrane if you don’t want it too spicy.)
In a large pot or dutch oven, sweat the garlic in small amount of oil
Add meat and brown meat with salt, black pepper and 1 tbsp chili powder; drain (or not)
Add all veggies and beans to pot and mix thoroughly.
Begin to heat the mixture on a medium-low setting. (You don’t need to add any liquid, as the veggies will release their water providing the liquid, but don’t turn up the heat too quickly or it will scorch.)
Add spices to taste. Here’s my suggestions:
2 – 3 tablespoons of Chili powder
1/4 – 1/2 tsp ground cloves
1/2 tablespoon cummin
1/2 – 1 teaspoon black pepper
dash of cinammon
When chili begins to bubble, turn down the heat; cover, simmer for 1 – 2 hours. Taste. I like it like this, but some people think it’s too concentrated and prefers add some water to thin it back out.
Congratulations. You have just made Mean Mean Pat Chili. Serve with cheese and your choice of bread, corn bread, crackers.
Notes: You can also use additional peppers. One of my favorites is to add in an habanero pepper.
There are basically three traditional ways to get out of college courses. All three involve taking a test that shows basic competency in the course material. Many high school students are familiar with AP (Advanced Placement) courses. You take a course in high school, then at the end of the school year, you take the AP test, and if you score high enough on it, you get college credit.
Both of these can be taken any time before or after college graduation. Better yet, you study at your own pace, so you can knock out two or three in a very short time if you put your mind and effort to it. There are some limits. Generally speaking:
You can only test out of 60 credits total. Most people will never reach this limit.
You cannot test out of a class you have taken, even if you withdrew. You can however sign up for a course, pass the test, and then drop the class if it has not yet started.
Which one should I choose?
Some subjects are covered only by one of the companies. In that case, you choose what is available. If both companies have the test, do some reading on forums and choose one.
Generally speaking, you get a text book and study it. Many subjects have dedicated CLEP study guides or CLEP text books. For math tests, I would highly recommend Khan Academy.
It would also be a good idea search online forums for other people’s recent experiences with the test. For example, the Public Speaking test requires you to submit a video taped speech. Apparently one of the most important things is that the speech be within the time limit.
Additional tips below under specific tests.
Which courses should I take?
Here is a PDF document of the exams that most Florida colleges and Universities will accept. However, just because a school will accept your credit does not mean that it will help you graduate.
The following recommendations are specifically for Palm Beach Atlantic University (because that’s where I work) nursing students:
Composition I
Biology
Public Speaking
General Psychology
Lifespan Development
Algebra
Statistics
English Composition
You absolutely cannot go wrong taking this one*. Practically every school requires it. You need to take the test in the Summer before you start as a freshman, because it is almost always taken in the 1st semester. It is almost impossible to get out of taking Comp II. Your best bet is to CLEP a literature course and see if your school will count it, however, if your school also requires a literature course, you can’t have the CLEP test count for both Comp II and the literature course. You could CLEP two literature courses.
*Actually, if you’re planning on doing the Honors Program at PBA, then it won’t matter if you take this or not. You’ll still have to take the Honors version.
Western Civilization I and II
This is a safe bet for most schools as they require Western Civ I and II plus a literature course. PBA is not most schools, and requires “Humanities I, II, and III”. They will however accept Western Civ I as Humanities I. Unfortunately, they will NOT accept the Western Civ CLEP for Humanities I. You’ll have to take this one through dual enrollment.
Biology
Biology I is required at PBA for A&P I and II and Microbiology. By taking this before you start as a freshman, you can get a jump start on these science courses.
Public Speaking
Oddly enough you can test out of public speaking, but you can’t get out of giving a speech. You have to submit a video of yourself doing one. If you’re planning on doing the Honors Program at PBA, then it won’t matter if you take this or not. You’ll still have to take the Honors version.
General Psychology
Students have told that this one is fairly easy. Here is a student’s experience with the test:
“I bought an AP Psychology prep book, and read it diligently while also taking notes on it. I then got on quizlet.com and used the flashcard for the Intro to Psychology Clep Test to practice my vocab. I studied about 2 hours a day for 2 1/2 weeks. I scored a 53 on the test.
As far as the test is concerned, a majority of it was giving you a scenario and you are asked what psychology concept is being used in the scenario. If you understand the vocabulary for Psychology, you should be able to successfully take the test. After taking the test, I reviewed what I studied, the only other thing I wish I had done, is there is a plastic card sold at Barnes n Noble for Intro to Psychology, it has every psychology vocab word used on the test.” — C.B., 2012, Freshman Nursing Student
Lifespan Development (Human Growth and Development)
Opinions vary on this one. Students that took General Psychology at PBA have told me that it is not a difficult test. It is essentially General Psychology with an emphasis on developmental theories/theorists, such as Erickson. Students who CLEPed both General Psychology and Life Span Development have told me that it was harder (but they still passed it.)
“The Lifespan Psychology test was quite simple for me to study and pass. I bought the review guide for this test and read the book in about 3 weeks. It was an easy read because the previous fall I had taken General Psychology which was a solid foundation to Lifespan. The material was not too difficult to understand and majority of it was interesting for me. I passed this test with a score of 59, in which passing is 50.” –T.M., 2012 Freshman Nursing Student
Algebra
Almost everyone has to take “College Algebra” these days, but let’s be honest. It’s more like 9th grade algebra. You should be able to do this one in your sleep. Interestingly, PBA nursing does not require College Algebra, but does require Statistics. You could just go straight for Statistics, but if you change majors, you’ll probably have to go back and take College Algebra.
Statistics
Required for just about every nursing program out there.
“Principles of Statistics however was much more difficult for me [than Lifespan Development]. I had never taken any statistics classes and therefore I was not able to understand it as well. Not having a teacher or tutor for an unfamiliar subject can be very frustrating at times. I researched the test and found many people suggesting “The Complete Idiot’s Guide to Statistics” as a good research that simplified the material. I found the book to be very helpful despite the difficult content. I passed the DSST test with a 447 with the passing score of 400. –T.M., 2012 Freshman Nursing Student
American Government
NOT RECOMMENDED for PBA. PBA requires its own course “Freedom in American Society.” This CLEP will not help you at PBA, but should at most other schools.
Some hand to hand techniques to retain your firearm or disarm an opponent.
Incorporating the hand to hand techniques into the overall firearm system.
Training Days
Each training day began and ended with live fire shooting with the hand to hand techniques taking the balance (and bulk) of the time. (The amount of shooting will depend on the level of the class. Classes with better shooters will tend to shoot more as Randy doesn’t have to spend as much time correcting errors.) The first day’s morning shooting was primarily a review of Randy’s Tactical Handgun 101* and Randy made adjustments to individual shooters as needed. As the days progressed we incorporated some of the hand to hand techniques into the shooting. Randy explained how things we learned in TH101 were now made important in light of the CQT techniques–in particular, step 2 of the draw stroke (retention). Randy stressed that hand to hand techniques must not only be effective but must fit into the overall system.
*TH101 or a similar class from someone Randy respects is a prerequisite for the CQT course.
The major hand to hand skills taught in the class include:
Basic movement and positioning
Buying time to draw a gun against a basic knife attack (not against a skilled knife fighter)
Preventing someone from taking your gun out of the holster.
Preventing someone who has a grip on your gun from taking it.
Taking a gun from someone else.
Preventing a gang banger from drawing on you.
What to do when you run empty at CQT distance.
Randy also demonstrates how these same techniques can be applied to long guns.
Some “parlor tricks” (You’ll think twice about using Sul once you see how easy it is to disarm.)
You don’t need to have any martial arts training to be able to learn the techniques, although it would certainly be helpful. The techniques are very forgiving and will often work even if you don’t execute them quite right. The class is somewhat demanding physically, and everyone broke a sweat despite the perfect 70 degree weather. Expect to get a little banged up (you’ll be slamming your shoulder into someone’s arm A LOT), however, you do train at your own level, and if you follow Randy’s instructions and advice, you won’t get hurt. If you’re sedentary, I’d recommend being able to walk at least a mile without getting winded to get more out of the class.
Randy is a both a very patient and demanding instructor. He’ll take the time to help individual students fix shooting problems even though that’s not the focus of this class. Once he knows your level, he’ll push you to continue to improve.
Before you come to the class, I’d also recommend de-horning your practice (blue) gun. Take the sights off, round the sharp edges (including safety, slide lock, take down lever, hammer, and beavertail).
It was a fabulous class, incredibly eye opening, and highly recommended.
To work closely with a killer whale in a marine park requires experience, intuition, athleticism, and a whole lot of dramatic flair. Few people were better at it than top SeaWorld trainer Dawn Brancheau, who, at 40, was blond, vivacious, and literally the poster girl for the marine park in Orlando, Florida, appearing on billboards around the city. She decided she wanted to work with killer whales at the age of nine, during a family trip to SeaWorld, and loved animals so much that as an adult she used to throw birthday parties for her two chocolate Labs.
This past February 24, Brancheau was working the Dine with Shamu show, featuring SeaWorld’s largest killer whale, a six-ton, 22-foot male known as “Tili” (short for Tilikum). Dine with Shamu takes place in a faux-rock-lined, 1.6-million-gallon pool that has an open-air café wrapped around one side. The families snacking on the lunch buffet that Wednesday were getting an eyeful. Brancheau bounced around on the deck of the pool, wearing a black-and-white wetsuit that echoed Tilikum’s coloration, as she worked him through a few of the many “behaviors” he had learned during his nearly 27 years as a marine-park denizen. The audience chuckled at the sight of one of the ocean’s top predators performing like a circus animal.
The show ended around 1:30 P.M. As the audience started to file out, Brancheau fed Tilikum some herring (he eats up to 200 pounds a day), doused him a few times with a bucket (killer whales love all sorts of stimulation), and moved over to a shallow ledge built into the side of the pool. There, she lay down in a few inches of water, talking to him and stroking him, conducting what’s known as a “relationship session.” Tilikum floated inert in the pool alongside her, his nose almost touching her shoulder. Brancheau was smiling, her long ponytail flaring out behind her.
One level down, a group of families gathered before the huge glass windows of the underwater viewing area. A trainer shouted up that they were ready for Tilikum. That was Brancheau’s signal to instruct the orca to dive down and swim directly up to the glass for a custom photo op. It’s an awesome sight when six tons of Tili come gliding out of the blue. But that day, instead of waiting for his cue and behaving the way decades of daily training in captivity had conditioned him to, Tilikum did something unexpected. Jan Topoleski, 32, a trainer who was acting as a safety spotter for Brancheau, told investigators that Tilikum took Brancheau’s drifting hair into his mouth. Brancheau tried to pull it free, but Tilikum yanked her into the pool. In an instant, a classic tableau of a trainer bonding with a marine mammal became a life-threatening emergency.
Topoleski hit the pool’s siren. A “Signal 500” was broadcast over the SeaWorld radio net, calling for a water rescue at G pool. Staff raced to the scene. “It was scary,” Dutch tourist Susanne De Wit, 33, told investigators. “He was very wild.” SeaWorld staff slapped the water surface, signaling Tilikum to leave her. The whale ignored the command. Trainers hurried to drop a weighted net into the water to try and separate Tilikum from Brancheau or herd him through two adjoining pools and into a small medical pool that had a lifting floor. There he could be raised out of the water and controlled.
Eyewitness accounts and the sheriff’s investigative report make it clear that Brancheau fought hard. She was a strong swimmer, a dedicated workout enthusiast who ran marathons. But she weighed just 123 pounds and was no match for a 12,000-pound killer whale. She managed to break free and swim toward the surface, but Tilikum slammed into her. She tried again. This time he grabbed her. Her water shoes came off and floated to the surface. “He started pushing her with his nose like she was a toy,” said Paula Gillespie, one of the visitors at the underwater window. SeaWorld employees urgently ushered guests away. “Will she be OK?” one asked.
Tilikum kept dragging Brancheau through the water, shaking her violently. Finally—now holding Brancheau by her arm—he was guided onto the medical lift. The floor was quickly raised. Even now, Tilikum refused to give her up. Trainers were forced to pry his jaws open. When they pulled Brancheau free, part of her arm came off in his mouth. Brancheau’s colleagues carried her to the pool deck and cut her wetsuit away. She had no heartbeat. The paramedics went to work, attaching a defibrillator, but it was obvious she was gone. A sheet was pulled over her body. Tilikum, who’d been involved in two marine-park deaths in the past, had killed her.
“Every safety protocol that we have failed,” SeaWorld director of animal training Kelly Flaherty Clark told me a month after the incident, her voice still tight with emotion. “That’s why we don’t have our friend anymore, and that’s why we are taking a step back.”
I just got back from taking Louis Awerbuck’s Tactical Shotgun I class. My only previous experience with the Shotgun is Randy Cain’s Shotgun I class (see my write up here) about two years ago, and a few trap shooting outings with friends.
For those of you who are unfamiliar with Louis Awerbuck, he served in the South African Defence Force and has been training firearms for over thirty years. Randy considers him the best in the business, so naturally, I came into this class with big expectations.
Day 1
The course started out with a three hour briefing on safety, range etiquette, and all manner of information about the shotgun, everything from desirable features on a shotgun, idiosyncrasies of various models of shotgun, and ammunition selection to the mechanics of loading and unloading the weapon and the most common reasons for malfunctions. Before the briefing, Louis warned us that he talks more than anyone in the business and shoots less.
Louis is a bit of a character with a wry sense of humor and self deprecatingly refers to his “magnetic personality.” He is soft spoken and despite repeated admonitions of how much a jerk he is, we never witnessed it during our three days. His style is very low key, and he is very patient helping students to improve.
After lunch, we headed out to the range to pattern the shotguns with buckshot. I was using some really cheap buckshot that had an enormous pattern. After the second shot at seven yards, my pattern was about seven inches across. Other targets were had two inch patterns. He used my target to show just how much ammunition selection can affect the pattern. A second shot at seven yards with Federal Tactical 00 buck showed a 3 inch group, “Fastest barrel job you’ve ever seen. I just saved you several hundred dollars.”
After patterning the guns, we moved over to steel targets and ran a variety of drills including the ever popular Rolling Thunder.
Day 2
We started with some warm up drills on the steel and then did several variations of Rolling Thunder that involved a very small amount of teamwork and communication. Then we zeroed the shotguns on paper at 25 yards. Somewhere during this time, the class started dragging because people weren’t listening or paying attention. At this point, Louis really let the class have it, “Gentleman, I can’t run an unsafe range.”
After lunch, whatever had infected the group seemed to be gone, and we did a variety of slug drills and select slug before getting rained out.
Day 3
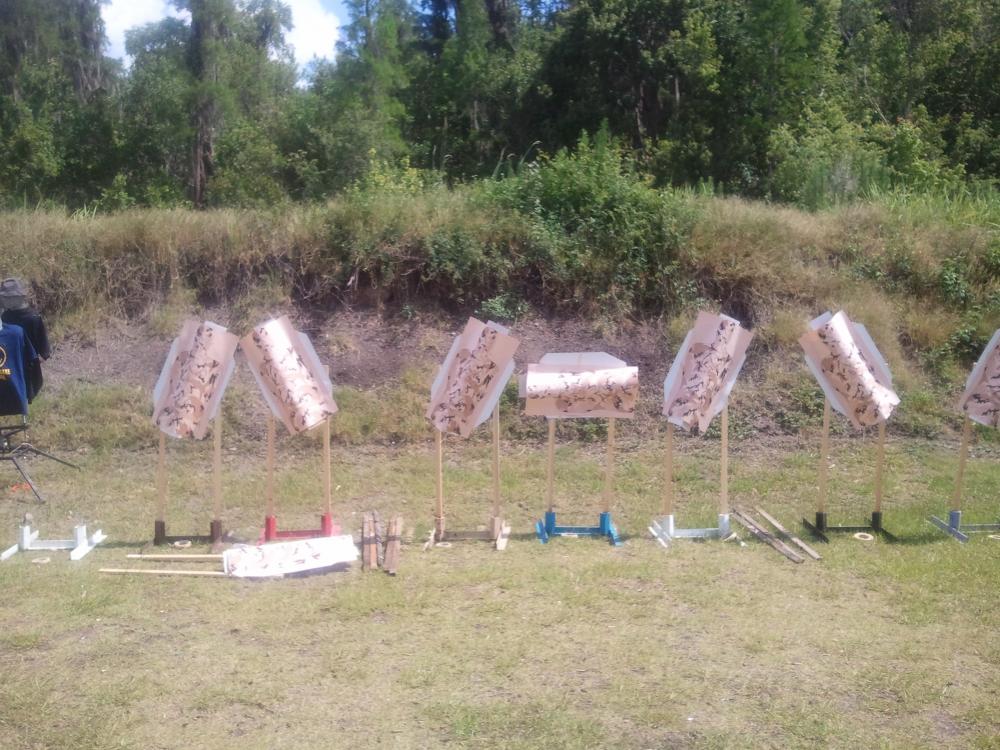
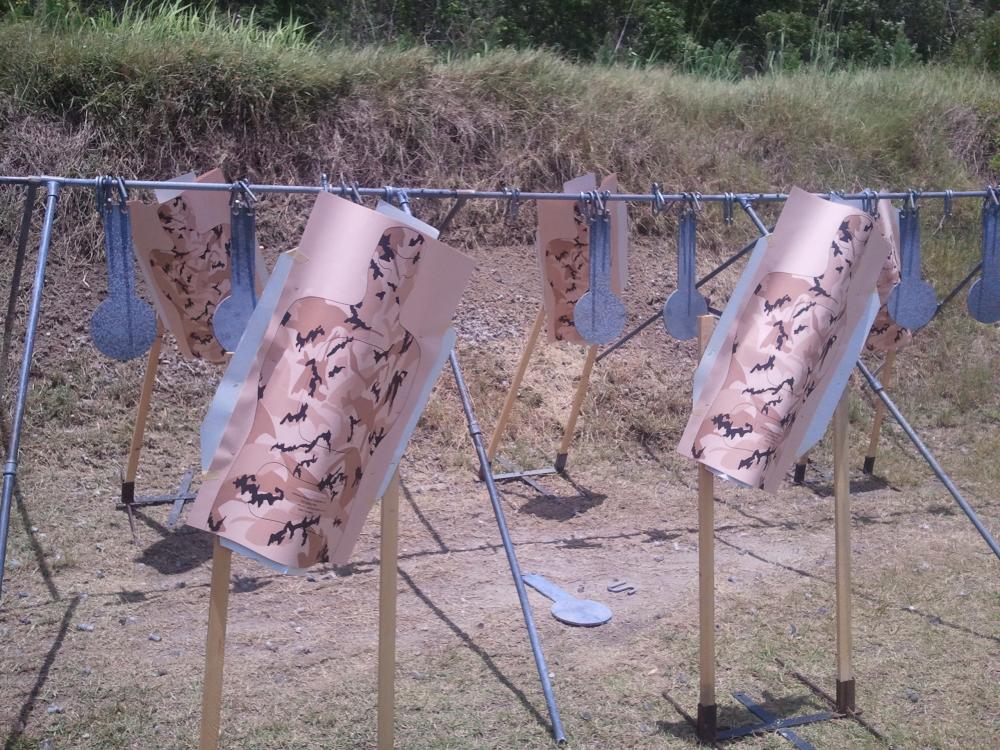
Again, we started with shot on the steel, only this time, it was complicated by having paper targets in front of and behind the steel. We were not allowed to hit the paper targets, forcing us to think about foreground and background, the size of our pattern, and how changing angles changes the target availability. Louis stressed that often, the best choice is not to take the shot.
Then we moved to Louis’ special moving rig target. We had to shoot an erratically moving bad guy with a bystander just behind him. Then we repeated the drill with a partner and three innocent bystanders.
Then we set aside the shotguns for handguns. Louis had set up targets at various angles to stress that the position of the target changes what constitutes a good hit. Four inches low on an upright straight on torso might still be a good hit. Four inches low on a torso at 45 degrees might be a miss altogether. Moreover, the targets were bowed outward to simulate a three dimensional person, stressing that the breastbone isn’t always center mass. This drill also had a second purpose. If we could not shoot handgun groups tight enough, we would not be allowed to actually fire the handguns on the next drill—handgun transitions.
First we learned how to dump the shotgun safely in order to draw the handgun. Then we went through the transition drills without shooting, then again with shooting. As a team, we had to hit every steel plate with buckshot from ten yards without hitting paper, then transition to handgun and hit every paper target without hitting any steel. Then we repeated the drill with select slug instead of transitioning to handgun.
Finally, we did long distance slug shooting at 50 and 75 yards on a steel target.
Conclusion
If I had to sum up the class in two words, it would be “Rule Four”. Being sure of your target was really the focus of the whole class. Louis’ class is very cerebral, with a lot of judgment calls about angles and thinking about what’s behind the target. Know your shotgun’s pattern at this distance and know whether you can safely make the shot.
The class had a relatively low round count, around 200 shot, and maybe 30 slugs. I don’t think I would recommend it for someone’s first shotgun class, not because of the low round count, but because the barrage of information can be overwhelming if you are completely unfamiliar with the shotgun and its concepts. Also Louis sometimes would say, “here’s the right way to do it” and then expected us to be able to do it without much practice. I think Randy’s class would be a better choice for a complete shotgun newbie because you just get more repetitions, and Randy goes slower on the initial skills. (On the other hand the lower round count is much easier on the shoulder). Either way, I do not think any shotgun student could call their education complete without taking Louis Awerbuck’s class. Randy Cain says that Louis Awerbuck is the best in the business, and I can understand why.
Thoughts about shotgun selection
Randy Cain is very clear that he prefers the Remington 870, and everything else is inferior. Louis Awerbuck seems much more appreciative of other shotguns, although most of the problems in our class stemmed from the autoloaders (as Randy predicted). The few Remington 870 issues we had stemmed from aftermarket parts. I set my 870 up according to Randy’s recommendations, and it ran like a champ. I had no problems. One thing I learned from listening to Louis’ comments to other students is that the Mossberg’s main advantage is its safety. (It’s on top, so you can turn it on or off without breaking a firing grip (including lefties).) However, if you put a pistol grip on a Mossberg, then it completely negates that advantage, because you can’t access the safety unless you break the firing grip.
Thoughts about the range
This is the fourth class I have taken at Southern Exposure Training. I can see a definite pattern. The classes are a mixture of law enforcement/law enforcement, security personnel, and regular folks with a large amount of repeat customers. Most have trained at other facilities and with other instructors, but keep coming back to Southern Exposure because of the high quality of instructors that Irv Lehman brings in combined with the relaxed but professional atmosphere. In every class that I have taken, at least one student has traveled from out of state to train there. I will be definitely be back.


Recent Comments